- support@clearvisiontech.com
- (909) 484-2052


After selecting your import file, you will see the Import Data window.
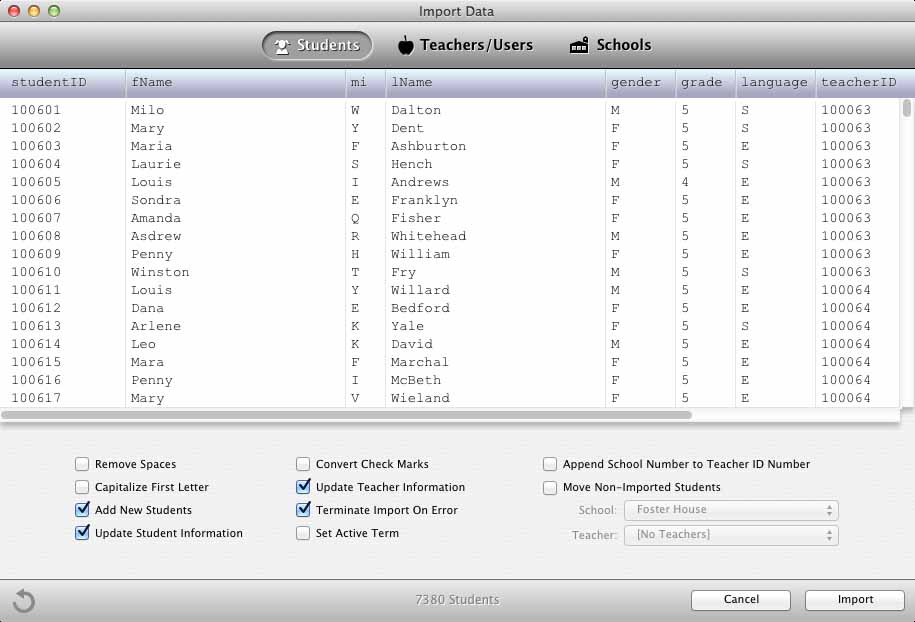
Review the data by using the Schools, Teachers/Users and Students tabs at the top of the window. Verify that all the data is present and that columns match the data. If any changes are needed to your import file, you can make the adjustments to the file and click the  Reload Data button.
After you have verified the data, set the import options at the bottom of the window as desired. These options are:
Remove Spaces
Some databases export their data with fixed-length fields. This option, if checked, will remove any extra spaces in each field. For example, if a student’s first name is imported as “Sara _ _ _ _ _ “, the spaces after the name will be deleted and only “Sara” will be imported.
Capitalize First Letter
Some databases export their data in all capital letters. This option, if checked, will convert each field’s data to lower case and capitalize each word. For example, if a student’s first name is imported as “SARA“, the name will be imported as “Sara”.
Add New Students
This option, if checked, will allow the import and creation of new students. If this option is unchecked, any new students you attempt to import (meaning that the student does not already exist in SIMON) will be ignored.
Update Student Information
This option, if checked, tells SIMON to update any student information with information from the import file. This information includes Student Name, Middle Initial, Last Name, Grade Level and Gender. All other information will be imported/updated regardless of the setting of this option.
The reason for this is that the teacher may change some of this information. For example, the teacher might change the student’s name from “Michael” to “Mike”. Leaving this option unchecked will preserve the teacher’s modifications, but still allow you to import/update other data or move the student.
Convert Check Marks
If you are importing data and that data includes check marks to be placed on the report cards, you can have SIMON replace the imported data to the appropriate check mark used on your report card. Check this box and another field will appear where you can enter the "check mark" you are entering.
For example, you might use the word “check” or an "X" to resemble the check mark in your import file. Enter the word “check” or "X" and SIMON will convert the check mark for you.
Update Teacher Information
This option, if checked, tells SIMON to update the teacher’s name with information from the import file. All other information will be imported/updated regardless of the setting of this option. The reason for this option is that many times the user (the teacher) will change this information. For example, the teacher might change the name from “Jones” to “Ms. Lisa Jones”. Leaving this option unchecked will preserve the teacher’s name, but still allow you to import/update other data.
Terminate Import On Error
This option, if checked, will stop the import if any error occurs during the import. If the option is unchecked, SIMON will only stop the import if a terminal error occurs. All non-terminal errors will be reported at the conclusion of the import.
Set Active Term
Check this option to set the active term in RCM. Choose the desired term from the menu. Note that the teacher will have the ability to change the active term in RCM.
Append School Number to Teacher ID Number
Check this option if you need to generate unique teacher ID numbers. The number of the school is the school's number as it is displayed in RCM. SIMON will add a three digit number before the teacher's ID number. For example, if the teacher's ID number is 123456, and the school number is 4 (004), the resulting ID number would be 004123456.
Move Non-Imported Students
Check this option to have SIMON move any students that are in SIMON but are not included in your import file. When you check this option, the School and Teacher popup menus will enable. Choose the desired school and teacher where SIMON should move students that are not included in your import file.
When you are ready to import your data, click Import.