- support@clearvisiontech.com
- (909) 484-2052


 Managing Comment Libraries
SIMON allows you to create and edit your own Comment Libraries that teachers can use in RCM. This is great if you need a bank of comments for a specific program you are using, or perhaps the 4th grade team has a set of comments they want to use.
Comment Libraries are layed out the same as RCM's default comment libraries. You create Categories, Sub-Categories, and Comments in multiple languages as needed.
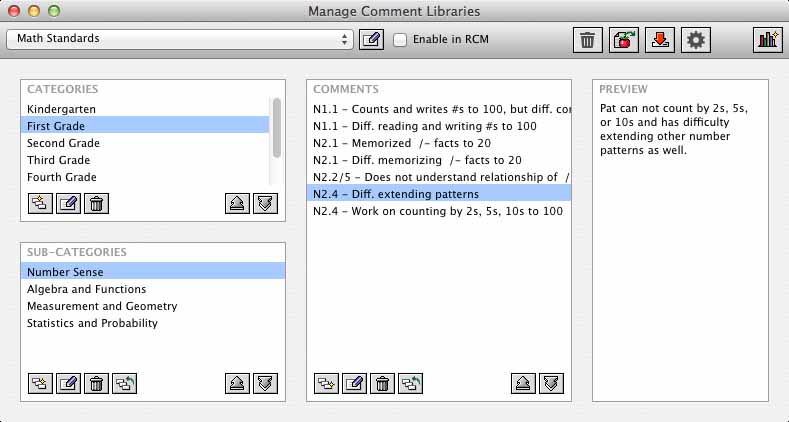
The Manage Comment Libraries window is similar to the Edit Comment window in RCM, which is where your comment library will be used.
Across the top of the Main Screen is the Tool Bar. The main part of the screen are the fields for your Categories, Sub-Categories, Comment Names and Preview.
SOME GENERAL CONVENTIONS
In each of the areas, Categories, Sub-Categories, and Comments:
 New button to add a new item.
 Edit button to edit the selected object.
 Delete button to delete the selected item.
 Move button to move the selected item to a different level.
 Move Up and
  Move Down buttons to move the selected item up or down in the list.
 Creating a New Comment Library
To create a new comment library, click the New Comment Library button. A new Untitled Library will be created. Click the Edit Library Name button (located next to the Library pop-up menu) to name your new library. The name you enter will appear in the Library popup menu in RCM.
Opening an Existing Comment Library
To open an existing comment library, Choose the library's name from the Library pop-up menu at the top-left of the window.
EDITING THE LIBRARY
Once you have selected the library you can edit Categories, Sub-Categories, and Comments as desired.
EDITING A COMMENT
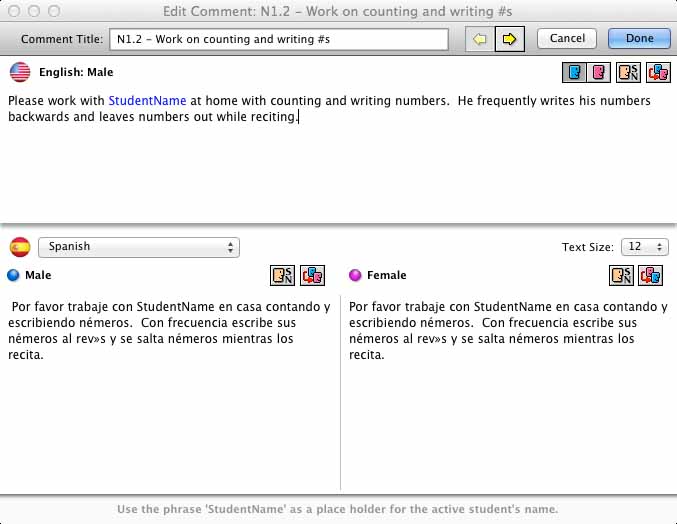
You can edit the content of a comment at any time. To do this, select the desired comment and click the Edit Comment button (or double-click the comment in the list). The Edit Comment window will open.
Comment Title
Use this field to enter the name of your comment. Creating a short name that describes the nature of the comment works best. For example, "Good Reader" or "Needs Help".
 The English Comment Field
The English Comment Field is where you type the English version of your comment. It is thought that RCM changes the pronouns of comments to match the student. Actually, you provide a Male version and a Female version of your comment.
 Click the Male Comment button to display the male version of your comment.
 Click the Female Comment button to display the female version of your comment.
 Click the Male to Female button to copy the male version of your comment to the female version. Using this option will delete any existing female comment and replace it with the male version. Also, the program will also attempt to convert the pronouns to the female gender. It is strongly advised that you review the generated female version of your comment after using this option.
 As you type your comment, you can use the word "StudentName" as a placeholder for the actual student’s name. When your comment is applied in Report Card Maker, "StudentName" will be replaced with the active student’s name. You can also use "StudentName" as a possessive plural. For example, "StudentName’s". If the active student’s name ends in "s", the "‘s" will be dropped. As you type, you can insert "StudentName" by clicking the "StudentName" button.
 Additional Language Comment Fields
The Additional Language Comment Fields are the place to type a version of your comment in another language. Just like the English version of your comment, you must provide both a Male version and Female version of your comment.
Use the "[language] Male" field to type the Spanish male version of your comment. Use the "[language] Female" field to type the Spanish female version of your comment.
Click the Male to Female button to copy the male version of your comment to the female field. Using this option will delete any existing female comment and replace it with the male version. Library Maker will not perform any gender conversion.
 Click the Female to Male button to copy the female version of your comment to the male field. Using this option will delete any existing male comment and replace it with the female version. Library Maker will not perform any gender conversion.
As you type, you can insert "StudentName" by clicking the "StudentName" button.
Importing/Exporting Comments
You can import Custom Comments from an export Custom Comment file from RCM.
 Click the Import button on the Main Screen and choose Import From RCM Comment Export. When prompted, select the Custom Comment Export File that contains the custom comments that you want to enter.
The custom comments contained in the selected teacher file will be inserted into the currently selected Category, and Sub-Category. Once your comments are imported, you can move them to another Category or Sub-Category.
In Report Card Maker, the user does not have to create a female version of their comment in English. However, your comment library requires both male and female versions, so be sure to create a female version of the comment in English.
Importing Comments From A Text File
You can create a new comment library by importing the comments from a text file you create. The file you import needs to be in a specific format.
The format of the file needs to be plain text, tab-delimited and exactly like this:
COMMENT LIBRARY NAME
TABCategory 1
TABTABSub-Category 1
TABTABTABComment Name
TABTABTABTABEnglish Male: comment text
TABTABTABTABEnglish Female: comment text
TABTABTABTABSpanish Male: comment text
TABTABTABTABSpanish Female: comment text
TABTABCategory 1 Sub-Category 2
TABTABTABComment Name
TABTABTABTABEnglish Male: comment text
TABTABTABTABEnglish Female: comment text
TABTABTABTABSpanish Male: comment text
TABTABTABTABSpanish Female: comment text
Notice that the entry for each comment starts with the Language, then the gender, then a colon, then the body of the comment.
Click the Import button on the Main Screen and choose Import Comment Library File. When prompted, select the Custom Comment Import File that you created. When the import is complete, you should see the new comment library in the list.
Exporting Comments
You can export all the comments in your library in a text file. This can be a very useful option. For example, you may want to print out the comments, or post them for teachers to review. This option makes this task easy.  To save your comments library in a text file, click the Save to File button on the Main Screen. A standard Save As dialog will allow you to set the name and location of the text export.