- support@clearvisiontech.com
- (909) 484-2052


 Teachers
Choose this option to delete all Principal's Notes for the active school year added by Principals and Vice Principals from all schools. Normally, teachers will delete a Principal's Note once they have read it. This feature can be used as a reset for principal's notes from term to term.
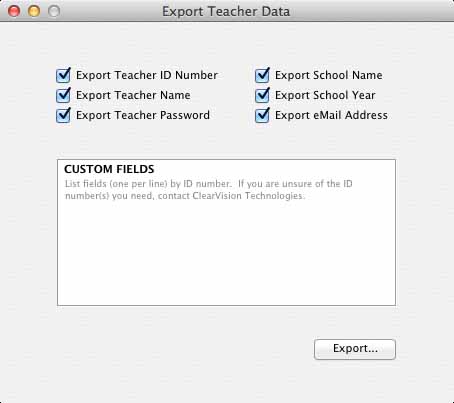
For example, you may want a list of each teacher’s password, ID number or school.
Select from the available data elements to export to include in the export:
Use the Custom Fields area to export any custom data specific to your district’s reports or forms. Enter the ID number of the desired fields. If you are unsure of the custom field ID numbers, contact ClearVision Technologies for assistance.
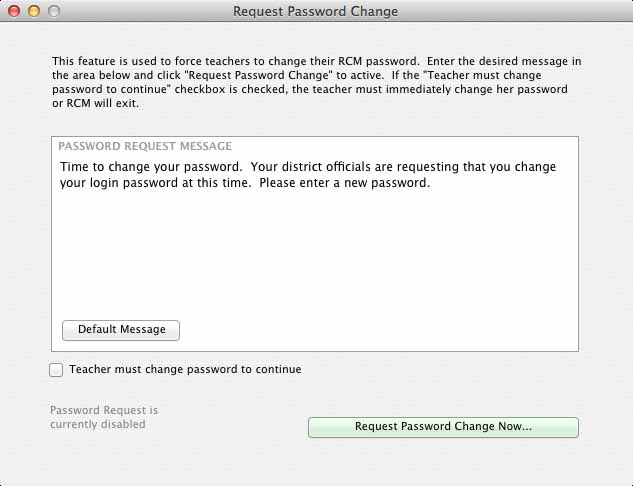
Use this option to request, or force, teachers to change their RCM password.
Enter a message in the message field or click the Default Message button to enter the default message:
Time to change your password. Your district officials are requesting that you change your login password at this time. Please enter a new password.
Click the Request Password Change Now to activate the change request. When teachers login to RCM, they will be presented with the message you entered.
If the Teacher must change password to continue checkbox is checked, the teacher cannot proceed without changing their password.
To remove the password request, click the Remove Request Password Change button.
Choose this option to set the active period for all teachers. This is the same as the teacher selecting an Active Term in Report Card Maker.
Note that the teacher can override this setting in RCM.
This option allows you to set a Teacher Level Field for all teachers at one time. A Teacher Level Field is an area on a report card that belongs to the teacher. For example, you may have an Area of Study field on your report card. If this field is intended to be the same for the entire class, you could use this option to fill that field.
Setting the Teacher Data Field
After choosing Set Teacher Data Field from the Teachers option in the Utilities menu, you'll be asked to enter the field ID, the Language of the field, and finally the data you want to set.
This option will take a RCM 5 archive (from SIMON) and import the custom comments in that archive into RCM6.
When prompted, select the folder that contains the desired archive. You'll find the SIMON 5 archives in the SIMON 5 folder in the Preferences folder, in the Archives folder. In the Archives folder, you should see folders named with numbers. In general, choose the largest number - the folder with the latest date.
Teachers can create a list of students in RCM to easily view groups of students. For example, a teacher may be a team teacher to several other teachers and therefore have potentially hundreds of students. She may want to group students together by period or classes to easily view groups of students.
This option allows you, the RCM Administrator, the ability to import these student lists for the teachers. The teacher will have the ability to edit, or delete these students lists.
To begin, create a plain text file that contains the data you want to import. The format of the file is just three tab-delaminated columns:
studentID [tab] teacherID [tab] nameOfStudentList
Create one line for each teacher student combination. For example:
2401 [tab] 10005 [tab] Period 1
2409 [tab] 10005 [tab] Period 1
2411 [tab] 10005 [tab] Period 1
2414 [tab] 10005 [tab] Period 1
2418 [tab] 10005 [tab] Period 1
2406 [tab] 10005 [tab] Second Period
2424 [tab] 10005 [tab] Second Period
2429 [tab] 10005 [tab] Second Period
2436 [tab] 10005 [tab] Second Period
Once your import file is ready, save it as "plain text". If you are working in Excel, choose "Save As" from the file menu and select "Text (Tab Delimited)" as the file type.
Now, choose Utilities > Teachers > Student Lists > Import Student Lists
When prompted, select your plain text import file. After a moment, the import will be complete.
Remove All Student Lists
Since Student Lists are connected to a teacher, they will survive with the teacher from year to year. So, from time to time (specifically at the beginning of a new school year), you will probably want to remove all existing student lists and import the new ones. To do this, choose:
Utilities > Teachers > Student Lists > Remove All Student Lists
Once you confirm, all student lists will be removed from all teachers in your district or school.